You can’t even search for most basic apps in File Explorer search, for example, calculator or Microsoft Word, etc. And it’s very frustrating for users to manually locate all the files & folders while the search function is not working. The main issue could be Indexing issues or the index database might be corrupted or simply the search service is not running. In any case, the user is at loss here, so without wasting any time let’s see how to actually Fix File Explorer Search Not Working issue with the below-listed troubleshooting guide.
Fix File Explorer Search Not Working in Windows 10
Make sure to create a restore point just in case something goes wrong.
Fix File Explorer Search Not Working in Windows 10 Method 1: End Cortana’s process Method 2: Restart Windows Search service Method 3: Run Search and Indexing Troubleshooter Method 4: Search the Contents of Your Files Method 5: Rebuild Windows Search Index Method 6: Add System Permission to A File/Folder Method 7: Re-register Cortana Method 8: Change Default Apps by protocol Method 9: Create a New Administrator User Account Method 10: Allow the Disk to be Indexed Method 11: Run DISM to fix corrupt Windows files Method 12: Repair Install Windows 10
Method 1: End Cortana’s process
Press Ctrl + Shift + Esc together to open Task Manager.
Find Cortana in the list then right-click on it and select End Task.
This would restart Cortana which should be able to fix File Explorer Search Not Working issue in Windows 10 but if you’re still stuck then continue with the next method. It might interest you to read Fix Word File Permission Error in Windows 10 as well.
Method 2: Restart Windows Search service
Press Windows Key + R then type services.msc and hit Enter.
Find Windows Search service then right-click on it and select Properties.
Make sure to set the Startup type to Automatic and click Run if the service is not running.
Click Apply followed by OK.
Reboot your PC to save changes. Also Read: Fix File Explorer Dark Theme Not Working on Windows 10
Method 3: Run Search and Indexing Troubleshooter
Press Windows key + I to open Settings then click on Update & Security.
From the left-hand side menu, select Troubleshoot.
Now under “Find and fix other problems” click on Search and Indexing.
Next, click on Run the troubleshooter button under Search and Indexing.
Checkmark “File don’t appear in search results” and click Next.
If any issues are found, the troubleshooter will fix them automatically. Alternatively, you can also run Search and Indexing Troubleshooter from Control Panel:
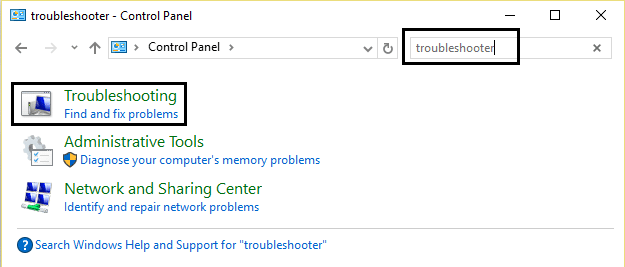
Press Windows Key + R then type control panel and hit Enter to open Control Panel.
Search Troubleshoot and click on Troubleshooting.
Next, click on View all in the left window pane.
Click and run the Troubleshooter for Search and Indexing.
Follow on-screen instructions to run the Troubleshooter.
If any issues are found, click on the checkbox available next to any problems you are experiencing.
The Troubleshooter may be able to fix File Explorer Search Not Working issue.
Method 4: Search the Contents of Your Files
Press Windows Key + E to open File Explorer then click View and select Options.
Switch to the Search tab and checkmark “Always Search File Names and Contents” under When searching non-indexed locations.
Click Apply followed by OK.
Reboot your PC to save changes. See if you are able to fix File Explorer working on it or search not working in Windows 10 issue or not, as this seems to work for most of the users, if not then continue to the next method.
Method 5: Rebuild Windows Search Index
Type indexing options in Windows Search then click on the top result to open Indexing Options.
Click the Advanced button in the bottom in the Indexing Options window.
Switch to File Types tab and checkmark “Index Properties and File Contents” under How should this file be indexed.
Then click OK and again open the Advanced Options window.
Then in the Index Settings tab and click Rebuild under Troubleshooting.
Indexing will take some time, but once it’s complete you shouldn’t have any further problems with Search results in Windows File Explorer.
Method 6: Add System Permission to A File/Folder
Right-click on the file or folder for which you want to change permission for and choose Properties.
In the file or folder properties window, switch to the Security tab.
SYSTEM should be present under Group or user names with full control under Permissions. If not then click on the Advanced button.
Now click on the Add button and then click on Select a principal.
This will open Select User or Group window, click on Advanced button at the bottom.
In the new window that opens, click on the Find Now button.
Next, select SYSTEM from the search results and click OK.
Verify SYSTEM is added and click OK.
Checkmark “Full Control” and “Only apply these permissions to objects and/or containers within this container” and click OK.
Finally, click Apply followed by OK.
Method 7: Re-register Cortana
Search Powershell and then right-click on it and select Run as Administrator.
If the search is not working then press Windows Key + R then type the following and hit Enter: C:\Windows\System32\WindowsPowerShell\v1.0
Right-click on powershell.exe and select Run as Administrator.
Type the following command in powershell and hit Enter:
Wait for the above command to finish and reboot your PC to save changes.
See if re-registering Cortana will fix File Explorer search not working in Windows 10 issue.
Method 8: Change Default Apps by protocol
Press Windows Key + I to open Settings then click on Apps.
From the left-hand menu, click on Default apps. From the right window, click on “Choose default apps by protocol” at the bottom.
In the Choose default apps by protocol list find “SEARCH“. And make sure Windows Explorer is selected next to the SEARCH.
If not then click on the program that is currently set to Default next to SEARCH and select Windows Explorer.
Method 9: Create a New Administrator User Account
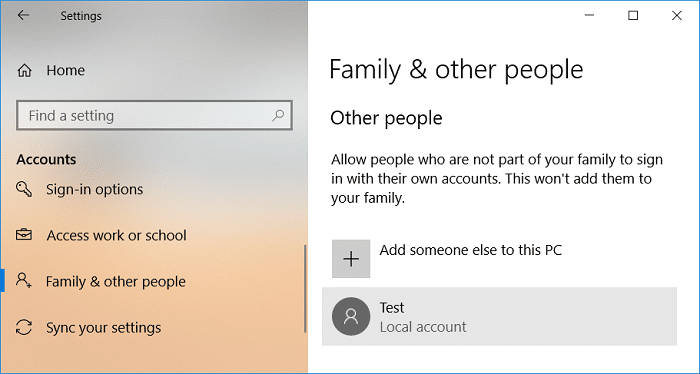
Press Windows Key + I to open Settings and then click Accounts.
Click on Family & other people tab in the left-hand menu and click Add someone else to this PC under Other people.
Click I don’t have this person’s sign-in information at the bottom.
Select Add a user without a Microsoft account at the bottom.
Now type the username and password for the new account and click Next.
Once the account is created you will be taken back to Accounts screen, from there click on Change account type.
When the pop-up window appears, change the Account type to Administrator and click OK.
Now sign in to the above-created administrator account and navigate to the following path: C:\Users\Your_Old_User_Account\AppData\Local\Packages\Microsoft.Windows.Cortana_cw5n1h2txyewy Note: Make sure to show hidden files and folders is enabled before you can navigate to the above folder.
Delete or rename the folder Microsoft.Windows.Cortana_cw5n1h2txyewy.
Reboot your PC and sign-in to the old user account which was facing the problem.
Open PowerShell and type the following command and hit Enter:
Now restart your PC and this will definitely fix the search results issue, once and for all.
Method 10: Allow the Disk to be Indexed
Right-click on the drive which is not being able to produce search results.
Now checkmark “Allow indexing service to index this disk for fast file searching.”
Click Apply followed by OK.
Reboot your PC to save changes. This should resolve File Explorer search not working issue but if not then continue to the next method.
Method 11: Run DISM to fix corrupt Windows files
Open Command Prompt with administrative privileges.
Enter the following command in cmd and hit enter:
Press enter to run the above command and wait for the process to complete, usually, it takes 15-20 minutes. Note: Replace the C:\RepairSource\Windows with the location of your repair source (Windows Installation or Recovery Disc).
After the DISM process if complete, type the following in the cmd and hit Enter: sfc /scannow
Let System File Checker run and once it’s complete, restart your PC.
Method 12: Repair Install Windows 10
This method is the last resort because if nothing works out then this method will surely repair all problems with your PC and will Fix File Explorer Search Not Working in Windows 10 issue. Repair Install just uses an in-place upgrade to repair issues with the system without deleting user data present on the system. So follow this article to see How to Repair Install Windows 10 Easily. Recommended for you:
8 Ways To Fix System Clock Runs Fast Issue Fix Search results not clickable in Windows 10 Fix Search Not Working in Windows 10
That’s it you have successfully Fix File Explorer Search Not Working in Windows 10 but if you still have any questions regarding this guide then feel free to ask them in the comment’s section.


![]()